


I recently got in touch with Matt Argo after being impressed with his ukulele videos on YouTube. Matt has put together a great ukulele lesson on The Beatles’ Blackbird. Over to Matt…
A few years ago I recorded a cover of “Blackbird” by The Beatles on the ukulele. In this article, I’d like to share with you how I play it.
The first step will be to download the tab which you can get here…
It’s also pretty important in this song to have a low G string on your instrument rather than a high G. However, if you absolutely don’t have that available to you, it won’t sound terrible, just not ideal. Finally, here’s the original video in case you wanted to hear it first:
Left Hand
So you first need to know where to put your fingers. This whole song basically consists of ascending and descending lines of chords. However, they’re not your standard chords and they all use only three strings. For instance, the first line of the song is: 0x32, 2×33, 4×35, x111010. In other words, you won’t find them on a chord chart. The only way to really learn the fingerings is to work through the tab and put in a lot of practice. But if you want to be walked through each fingering/chord one at a time, you can watch my video tutorial (link at the bottom of this article).
Right Hand
The rest of the article will be focused on the right hand. Now the whole song is played on three strings but they are not always the same three strings. For instance, you may be playing the G,E, and A strings, or maybe the C, E, and A strings depending on what part of the song you’re playing. So for picking, rather than calling the strings by their names, you can think about them as two outer strings and one inner string (in the above examples, the outer strings would be either G and A or C and A, while the inner string is E in both cases). This works because no matter the strings, there are only two picking patterns in the entire song.
The first picking pattern is very simple. First, you pluck the two outer strings together. Then, you pluck the inner string by itself. One example of this would be the very first thing you play:
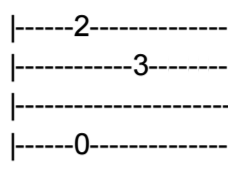
The G and A strings are plucked together on the open string and 2nd fret respectively. Then the E string is plucked on the third fret.
It sounds like this:
And here’s another example, where you are playing the G, C, and A strings on the 5th, 7th, and 7th fret respectively:
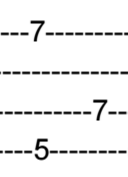
And this is what it sounds like:
The second pattern is a little more complicated. Like the first pattern, you first pluck the outer strings together and then the inner string after that. However that’s not the end. You then pluck the lowest string, followed by the highest string, and finally the middle string again. Here’s an example from the end of the first line where the C, E, and A strings are being played on the 11th, 10th, and 10th frets, respectively:
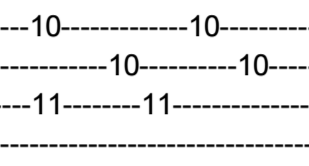
And this is what it sounds like:
And another example of this pattern would be this:
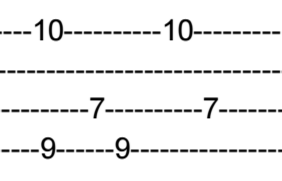
The G, C, and A strings are played on the 9th, 7th, and 10th frets respectively. And here’s the audio:
As far as what fingers to use on the right hand, I would basically assign a finger to each string. So the thumb always picks the lowest string, the index finger always picks the middle string, and the middle finger always picks the highest string. This applies to whichever three strings are being played. So in the most recent example, the G string would be played with the thumb, the C string with the index finger, and the A string with the middle finger. In the example before that, the thumb would be on the C string, the index on the E string, and the middle finger on the A string. Use this method for the entire song.
Conclusion
Now that you have the tab and the two picking patterns, you’re ready to play “Blackbird” on the uke. The only thing left to do is practice, practice, practice! If you want a more in-depth look at this song, you can watch my video tutorial down below. Hopefully this helps you learn this song and you are always welcome to subscribe to my YouTube channel for more videos and tutorials. Thanks!
Huge thanks to Matt for putting this brilliant lesson together!
What a lovely arrangement and a beautiful performance. Thank you for sharing the tab and instructions. I will be working on this for awhile and I’m excited to learn it.
Holy ____. I can’t believe human beings can do that with their hands and sing at the same time. I was watching TV this evening while eating ice cream and i got ice cream on my nose.