


How I’ve managed to run a ukulele website that teaches people to play ukulele for years yet haven’t covered hammer-ons and pull-offs in all that time I do not know. The good news is I’m correcting that right here, right now. Let’s get to it…
Hammer-ons and Pull-offs are embellishment techniques that can really lift your playing and add a layer of detail that makes your playing sound more intricate and developed.
Hammer-ons
Let’s start with the hammer-on. Ordinarily you pick a note, you hear that note and that’s that. The hammer-on adds a higher note after the initial picked note. This secondary note is sounded with your fretting hand, not your picking hand.
The technique to achieve this is to hammer your finger (usually your third finger but not always) down on the fretboard with enough speed that you actually hear the note that your finger lands on.
Hammer-on Audio Example
Listen to the following audio clip. You can hear the initial note played but shortly afterwards you will hear the second note.
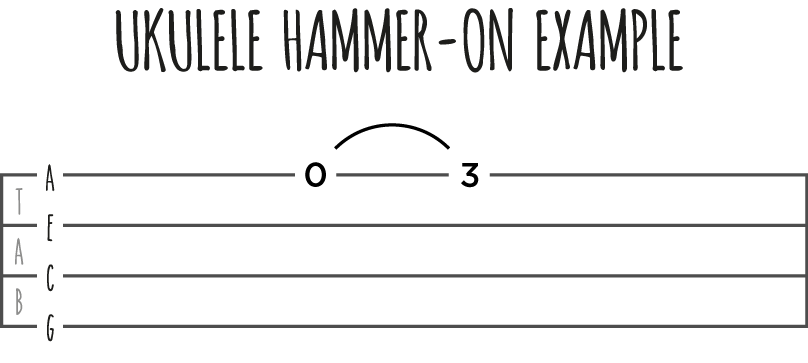
Let’s have a go a this. Pick the open A string on your ukulele. Directly after you hear that note I want you to drop your third finger down on the third fret of your ukulele as fast as you can. You should hear that secondary note. If it’s the first time you’ve ever tried to play a hammer on it was probably pretty quiet. Don’t worry about that yet, the volume will come with time and practice. What’s important to begin with is that you can hear that secondary note.
Over time you will start to increase the volume from your hammer ons until you’re getting a similar level of volume to that initial note that you picked.
There are a couple of tips that can help here.
Firstly, the speed that you can hammer your finger down onto the fretboard and secondly the connection that you make with the string and fretboard. The speed will come with time and is a lot to do with the dexterity of your fingers, there are no shortcuts for this.
Secondly, you need to ensure that the connection you make is good. You’re aiming to connect with your fingertip and not the pad of your finger. It may seem counterintuitive but the best way to do this is to practice slowly.
Although we initially used our third finger to play our hammer-on, they can be played with any finger. It’s worth practicing with all of your fingers. The following exercise has been created to help develop your hammer ons.
Pull-offs
Where hammer ons play a note higher in pitch than the original note, pull offs add a secondary note that is lower in tone. The principle is very similar to the hammer on, the technique is a little different though.
Pull offs begin with a fretted note. That note is plucked as any other note you would play. The finger that is currently fretting that note then pulls down and off the fret resulting in the secondary note sounding. Sound easy?
Let’s have a go.
We’ll start by fretting the C note on the A string (bottom) of your ukulele. Use your third finger to fret this note and play it as normal.
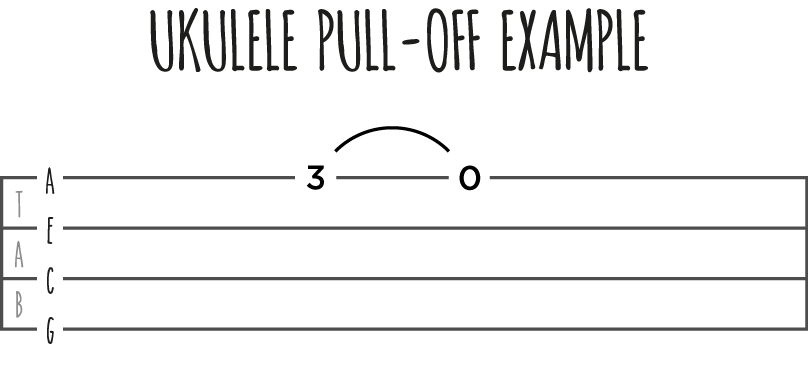
As soon as you hear that note, pull your third finger down and off the third fret. It should sound something like the following…
Much like hammer ons, it’s going to take a bit of practice to get the technique right.
Arguably pull-offs are a little easier to get the volume out of, but maybe a little tricker to get the finger movement quite right, particularly when you may pull into another string (this tends not to be a problem on the A string as there are no other strings below it).
Keep practicing with both hammer-ons and pull-offs, they may seem strange at first but over time they’ll become second nature and you’ll be throwing them into your playing without even really thinking about it.
This was so helpful. Thank you. It’s good to know this takes practice and is quiet at first. I have been almost muting the string every time I try a hammer on. This is the first place I’ve seen that this isn’t easy to start with. I’ve been thinking I just can’t do it. Now, I will just keep practicing more instead of avoiding hammer ons all together.
Really great video – clear and easy to follow. Wish I’d found you sooner. Please keep on with the good work.
Thanks! That was informative, even better that you included the audio for examples. Had no clue what that curved symbol was before – was playing it wrong knowing I’d go back and find out, as my intention was to remember the notes of the music first.
I’m really pleased that it helped, comments like this really spur me on.