


Moving from strumming to fingerpicking is when you know that you’re starting to get a little bit more serious with ukulele.
In this lesson I look at 5 fingerpicking patterns that you can use as a starting point to move your fingerpicking skills forwards.
Before we get started, the chords I’m using in the video to demo these fingerpicking patterns are C, Cmaj7, C7, F, G7 and back to C.
You don’t need to use the same chords as me, this lesson isn’t about your fretting hand.
We’re just aiming to focus on your picking hand so feel free to use whatever works best for you.
The Claw
The claw is probably the easiest fingerpicking pattern to get used to. It only uses your thumb, index and middle fingers which is a nice introduction to fingerpicking without pushing too far.
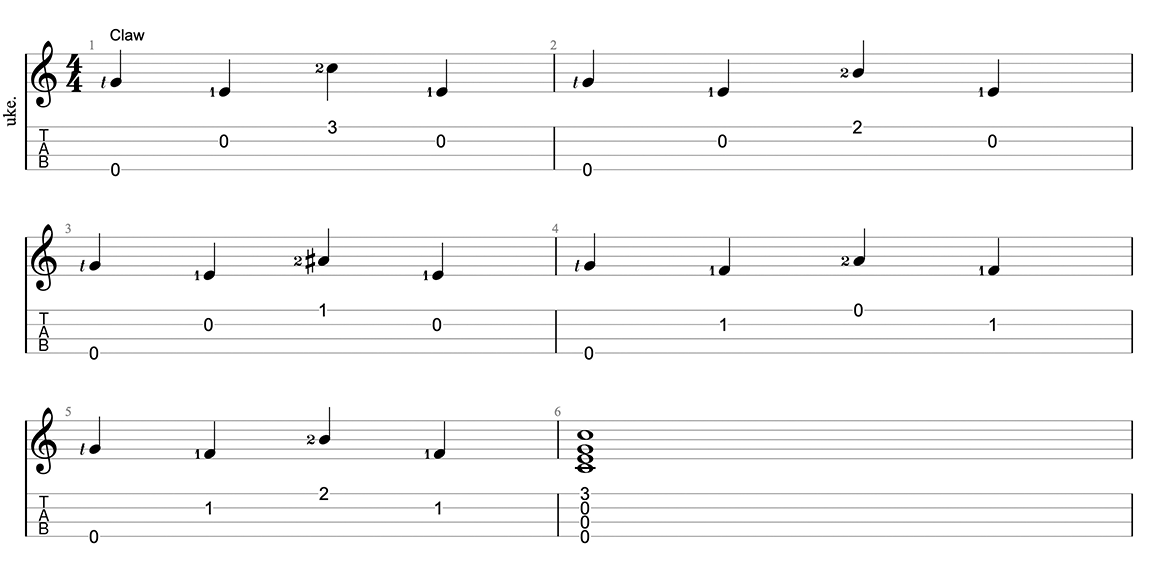
In this first pattern we’re plucking the G string with our thumb, the E string with our index finger and the A string with our middle finger. We’re leaving the C string completely unplayed (for now).
The order that I’m picking the strings in is thumb (G), index (E), middle (A), index (E).
After this you can either switch chords or pick the same sequence again.
If you’re new to fingerpicking completely, don’t worry about chords at all. Just fingerpick the open strings until you start to get comfortable.
Once you’re feeling a little more comfortable you can start to add a single chord in before progressing to multiple chords.
The Claw (Alternating Thumb)
The second pattern that we’re looking at take the claw pattern above and makes our thumb work a little bit harder.
Our thumb now is now tasked with covering both the G and the C string.
If you’re coming from a guitar background then this is essentially a form of Travis picking.
Travis picking for those that don’t know is a guitar technique which uses your thumb to alternate picking on the bass strings of the guitar.
I don’t like to refer to it as travis picking on ukulele as the re-entrant tuning means you’re not actually picking only bass notes.
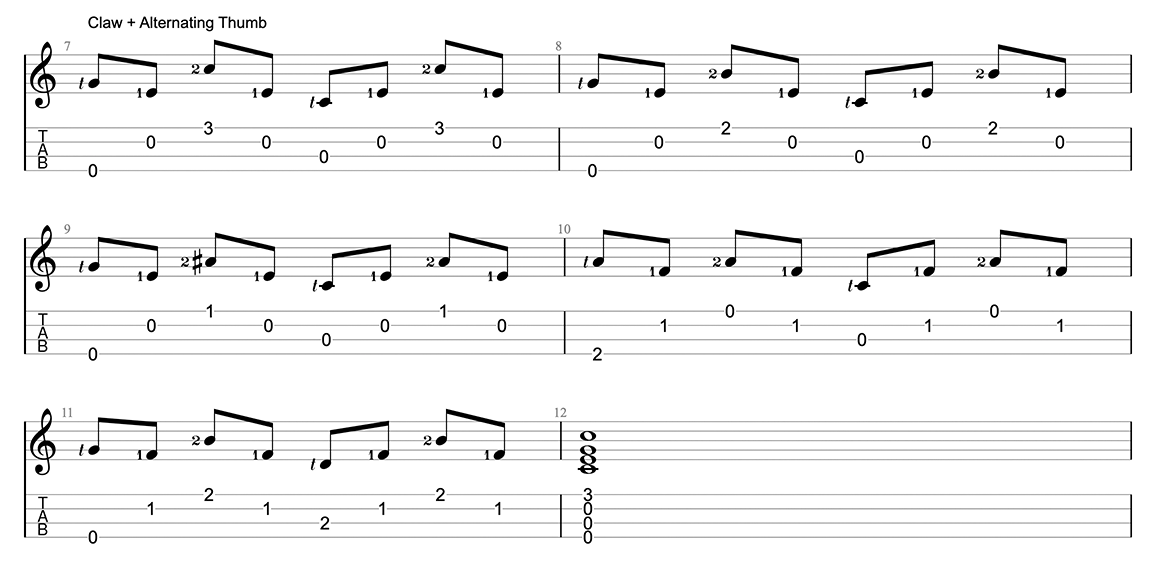
This time the picking order is thumb (G), index (E), middle (A), index (E), thumb (C), index (E), middle (A), index (E).
Essentially this is just the claw pattern above played twice but the second time we’re playing through it we’re using our thumb on the C string rather than the G.
Of course, this is just the starting point and you don’t necessarily need to start out on the G string, you could start with the C string.
As you play this one, notice the extra depth that plucking the C string brings. It adds a little more texture to your playing.
When it comes to fingerpicking, slow and steady wins the race
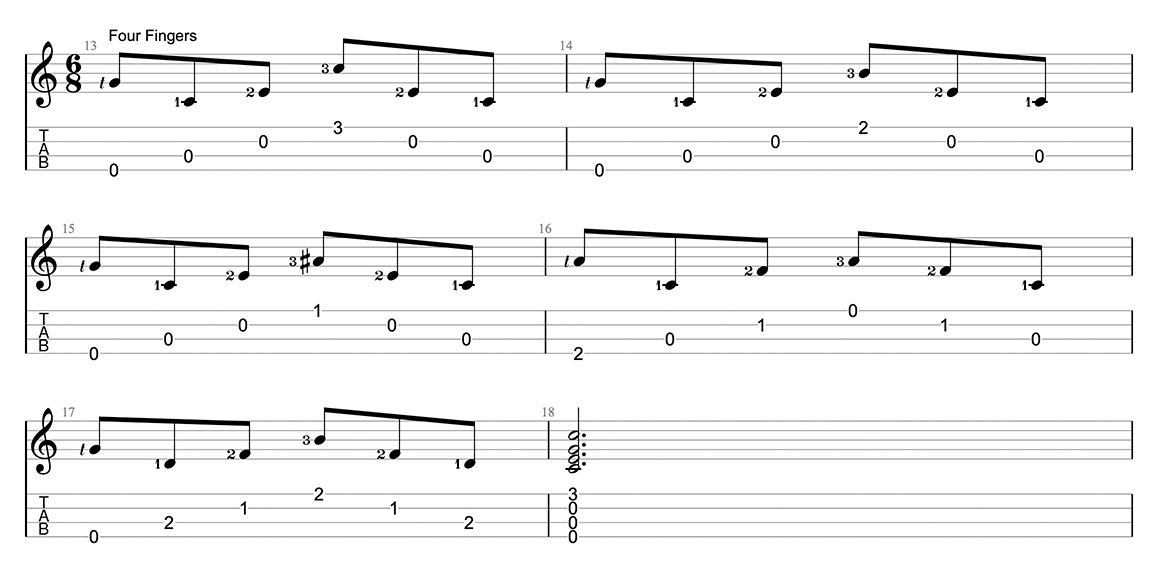
Four Fingers
In the third pattern we’re introducing our ring finger in and shifting the focus a little.
The easiest way to think of the four finger picking pattern is that each finger takes responsibility for a string.
Thumb gets the G string, index gets the C string, middle finger gets the E string and ring finger gets the A string.
A good place to start with this one is simple to place your fingers on those strings and get comfortable with that position.
This will teach you where your fingers should be in order to pick this pattern.
The actual pattern here is very simple, knowing that each finger is sticking to the string it’s been assigned to we’re just going to pick thumb, index, middle, ring, middle, index.
That means we’re picking the strings from the string closest to the ceiling as you hold the ukulele down to the string closest to the floor and then back up again.
If you’re not used to using your ring finger much then this may take a little practice but it will develop with time.
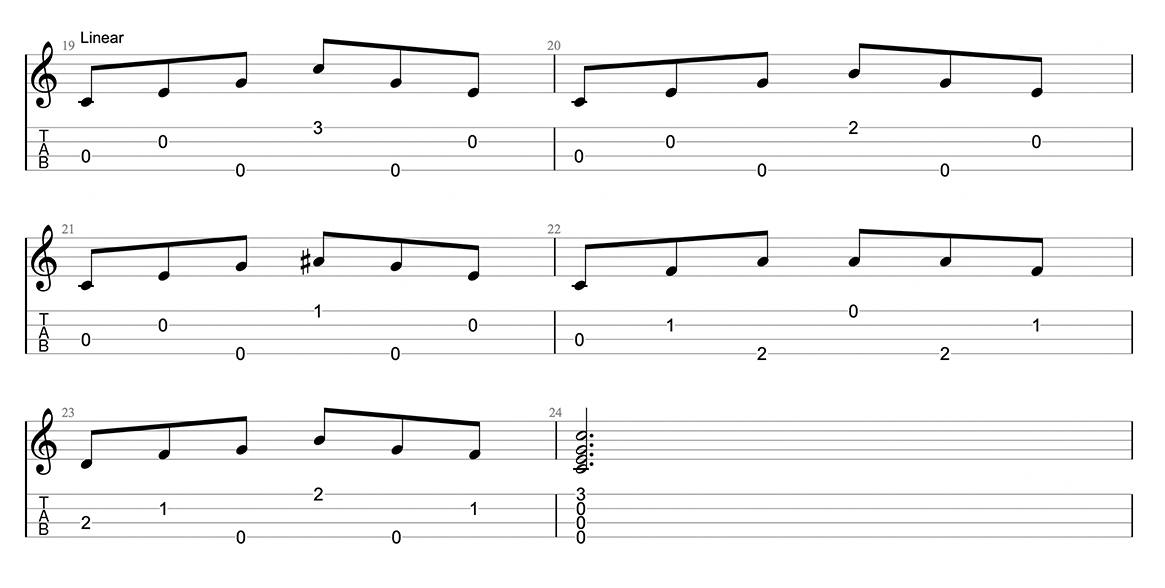
Linear Picking
Our fourth pattern uses a linear picking approach.
You may be thinking that we’ve already been picking in a linear fashion but this one is a little different.
This time we’re deliberately aiming to pick from the lowest open string to the highest open string.
I’m going to give you the option of using either a three finger picking style (like we used in the claw) or a four finger picking style to pick this one.
Personally I prefer to use the three finger picking style as I find it a little easier.
This makes our pattern pick the strings in this order C, E, G, A, G, E.
If you’re using a three finger picking style like I do then you’ll be picking this way: thumb (C), index (E), thumb (G), middle (A), thumb (G), index (E).
This is probably one of my most used fingerpicking patterns.
It may seem a little counter intuitive at first as you’re not simply picking up and down the strings in a visual manner but it will quickly become second nature.
To me this pattern sounds more like a guitar being picked than any of the others.
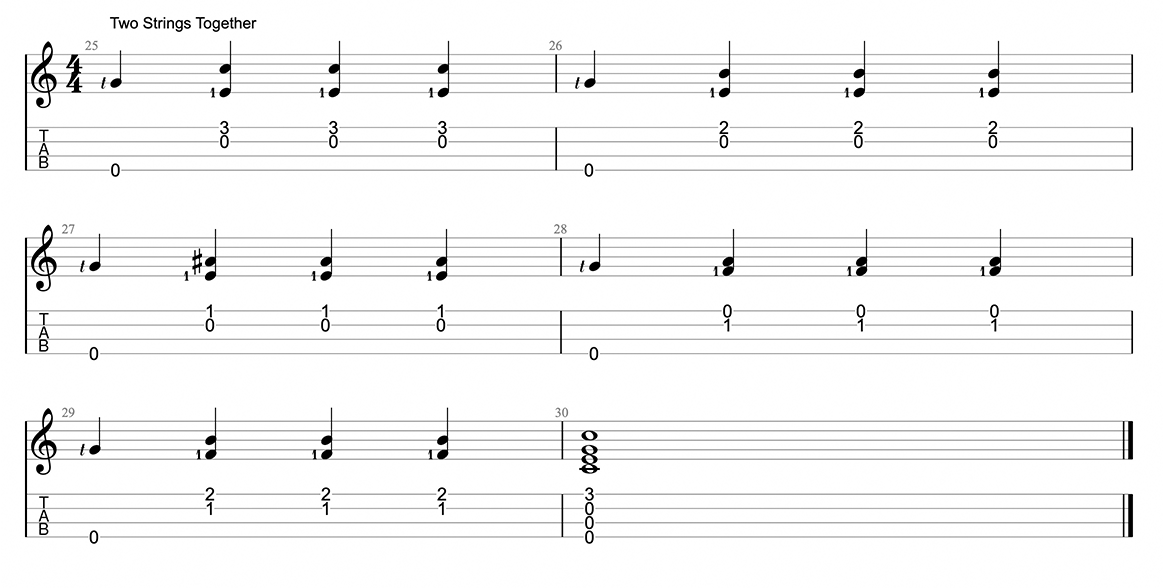
Two Strings Together
Fingerpicking doesn’t mean that you’re limited to picking just one string at a time. In the final pattern we start to look at picking two strings together.
Here I’m using my thumb to pluck the G string and my index and middle fingers to pluck the E and A strings together at the same time.
In the example in the video above I’m plucking thumb (G), index and middle (EA) x 3.
This a very simple pattern but it’s intended to open you up to the idea and give you a starting point to come up with your own patterns.
One simple tweak you could make is to introduce the alternating thumb approach alongside the two strings together style but the possibilities are endless.
Right at the end of the video I show you a technique which replicates a strum without strumming. This is a useful technique to get to grips with if you’re serious about fingerpicking. More about fake strums here.
And that’s it, any questions, please let me know in the comments.
This has been so good for me However because I have arthritic hands it’s been slow going. It’s good for the hands and many thanks. The chords are a challenge
It might be worth having a look at the post I made on playing ukulele with one finger. I know some chords are very difficult when you have arthritis so finding ways around them can be pretty useful.
What note do you have the G string tuned to? It sounds like a C.
Me? My G will always be tuned to a G
Isn’t timing important? Some fingerpicking patterns are 3/4 , some are 6/8 and some are 4/4. Your linear picking is in 6/8 or 3/4 time. But you did not put the timing next to the treble clef.
Don’t you have to match the timing of a picking pattern to the timing of a song??
Timing is important, although when you’re playing completely isolated exercises like I’m showing here I’d argue that it isn’t completely necessary and I’m trying to keep things as simple as possible for people. Great point though.
This has been very useful! I’m a beginner and love fingerpicking.
Glad it helped