


Most beginners struggle with being able to switch chords and keep a steady tempo at some point. In this post, we’ll take a look at a technique to switch your fingering to speed things up.
The Problem
Learning the chords, strumming pattern and lyrics isn’t always enough. If you can’t transition between the chords quickly enough your playing is going to sound very disjointed. Smooth transitions are essential to playing music.
60 Second Chord Changes
I’m a big fan of the 60 second chord change method to help speed up chord changes. Using this method you simply structure your practice to spend 60 seconds of pure focussed time working on the chord changes that are causing you problems.
I’ve previously written about 60 second chord changes and would definitely recommend using this technique to help, but it’s not the only way…
Alternative Fingering
Another option at your disposal is to change the way you finger chords in order to make them easier to switch between.
Let’s start with an example.
The chords Am, F and G7 are a great way to illustrate this.

Starting with an Am, fretted the regular way your second finger is on the G string at fret 2.
As you move into the F chord, your second finger stays in place as your index finger drops onto the first fret of the E string.
Finally, as you fret the G7 chord you leave your index finger in place and drop your second and third fingers on the second fret of the C and A strings.
Through every change a finger remains from the last chord. This is incredibly useful and it anchors your hand making chord changes simpler and faster.
So can we use this technique when making other chord changes?
The short answer is yes, so let’s take a look at an example where this isn’t standard practice.
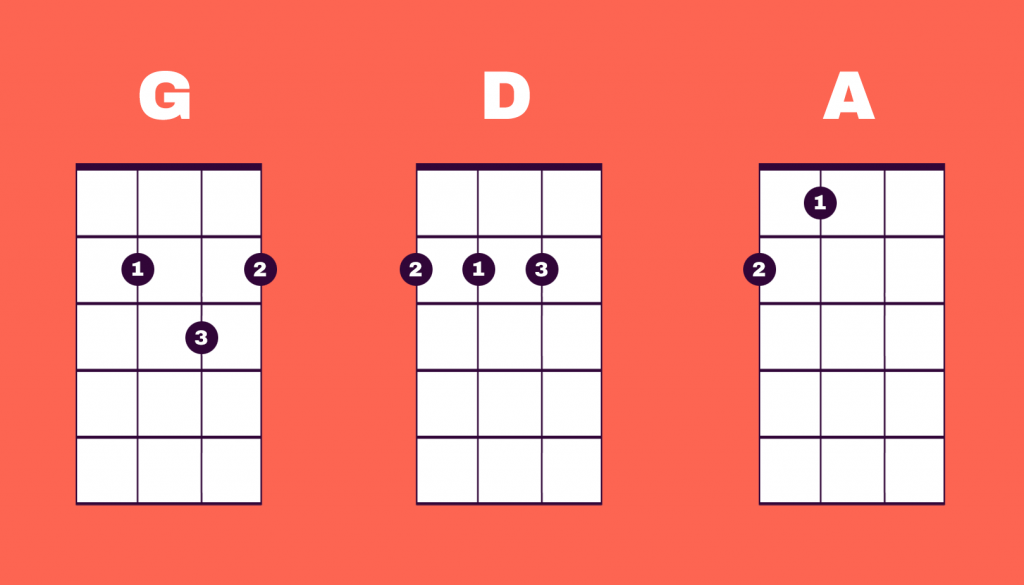
This time we’ll look at G, D and A.

If we play G, D and then A using standard fingering we have to lift every finger off the fretboard in order to change between the G and D, but this happens again between the D and the A. Not ideal.
From And To
It’s important not to consider chords in isolation. You need to look at where you’re coming from and where you’re going to. If we take the D as an example here, you’re coming from a G, into a D and then moving on to an A.
What if we were to change the fingering on the D chord a little to help us out?
Instead of playing the D chord using fingers 1, 2 and 3 on the top 3 strings top to bottom, we’re going to change the order of our fingers to 2, 1 and 3. This means that our index finger now stays in place from our G chord, but it also stays in place as we transition in to the A chord too.
A small change in finger position has resulted in a much simpler transition between 3 chords.
As G to D and D to A are pretty common chord transitions, I almost always play the open D chord with this alternate fingering.
G to E minor
Another example would be moving from G to E minor. Again the standard fingering means all our fingers have to leave the fretboard to shift between a G and E minor.
If we change the way we fret the E minor, we can make this transition very easy.
Keeping the G chord fretted, you simply need to drop your pinkie finger on the 4th fret of the C string.
Final Thoughts
If you’re struggling with a change or you just like to experiment a little, see if you can come up with an alternate way to fret the chord to put your fingers in a better position. You don’t have to go by the book every time.
I often transpose my index and middle finger to play G chord, so C string is index finger, A string is middle finger and E string is my ring finger and then change to Em chord leaving the index finger on the A string and just moving the other two. Not sure if that makes sense without diagrams.